Before you begin, make sure you have Wi-Fi access (have the network name and password handy), and that Bluetooth is enabled on your smartphone.
Then follow these steps:
(You can download a new copy of the Quickstart Guide here)
1. Charge gitaplus for 10 minutes
Remove the charger from the accessories tray and plug the charging cable into the charging port at the back of gitaplus, then plug the power cable into a wall outlet.
2. Install the mygita app & create your account
While gitaplus is charging, download the mygita app from the App Store or Google Play Store. Sign up and create your account. During the account creation, you will be sent an email with a verification code. After uploading your profile picture, select the option “I bought a new gita.”
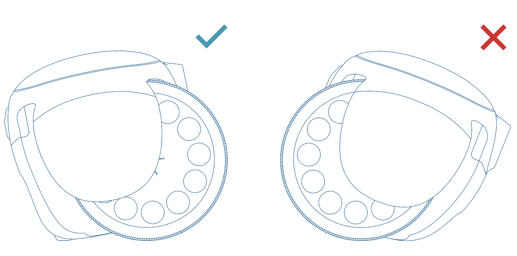
3. Lean gitaplus back
Ensure that your gitaplus is leaning back instead of forward. When gitaplus stands up to follow someone, it is expecting to be leaning back so it can initially balance properly.
4. Turn on gitaplus
Press the power button—it’s right above the charging port.
5. Continue setting up the app
Scan the QR code provided in your Quickstart guide.
Lost your QR code? No worries, just give us a call (1-800-791-0843).
6. Name your gitaplus
Personalize your profile by giving your gitaplus a name and adjusting your app settings and notifications.
7. Connect gitaplus to your Wi-Fi network
Having trouble connecting to a network? Call us: 1-800-791-0843.
8. You’re ready to roll!
Your first walk with gitaplus:
-
Touch the button on the front of gitaplus to activate follow mode.
-
gitaplus will stand up and self-balance.
-
Start walking and gitaplus will follow!
-
To end your walk and park gitaplus, touch the button again. gitaplus will stop following you and sit down (Park mode).